Quick & Easy Guide to Waterfall Photography
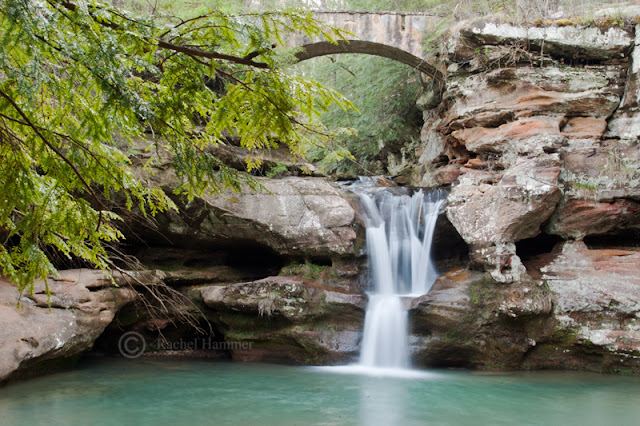
Are you craving professional-quality photographs of waterfalls with silky smooth water gliding over beautiful scenery? My waterfall photography tutorial is about to let you know that it isn't as hard as you might think.
What's the key to that milky look?
The short answer is your shutter speed. Shutter speed is how fast your camera takes the picture - thought of another way, it's how long the chip (or film) is exposed to the light. A short shutter speed freezes motion, while a long shutter speed creates a blurred impression of movement.
To achieve silky flowing water, you want to have a long shutter speed.
A long shutter speed will be read out as a lower number on your camera.
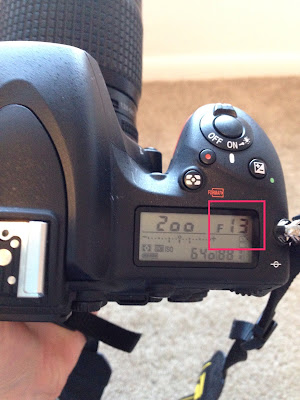
The number in the red box is the shutter speed. 200 is a relatively fast shutter speed; it won't give your waterfall photography the quality you are looking for.
That sounds great, but how do I get that?
In essence, you want to reduce the amount of light that your camera sees. To compensate for less available light, your camera will need to expose the chip for longer - thus giving you the silky waterfall appearance you want.
Depending on what kind of camera you have, you will need to adjust different parameters to achieve a long exposure. In the simplest terms, you want to change your shutter speed to the lowest number possible (shutter priority mode). However everything in life and photography is give and take - you will still have to reduce the overall light the camera sees to obtain a properly exposed image.
There are a few different ways to lengthen your shutter speed, and some of them will depend on the capabilities of your camera.
If you are able to, you will want to change to a small aperture and a low ISO rating.
Aperture is the opening through which the microchip in the camera sees light - remember, we want to reduce the amount of light available to the camera, so we want to make this opening as small as possible. Aperture is a fraction; thus a larger number means a smaller aperture.
Here I have highlighted the aperture; these numbers may appear in different places on your camera, or you may not have the option to see or change them at all.
"F" designates "aperture" on many cameras (you may also see this referred to as "stopping" or "f-stop"). This is properly interpreted as 1/13; remember you want to set your aperture to the smallest possible, so you want the largest number (because it's a fraction).
What about ISO?
ISO determines how sensitive your camera is to light; again, we are trying to reduce the amount of light available to we get a slow shutter speed, a long exposure, and the beautiful waterfall magic of our photography dreams. You want to set your ISO to the lowest number allowed by your camera.
Okay, great. So I've done all of the above - what else?
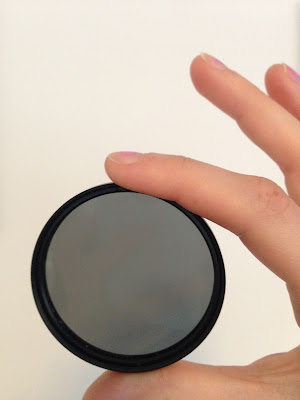
Another important tool is a neutral density filter. This isn't the same kind of filter you'll find on Instagram, rather this attaches to the end of your lens and (again) reduces the amount of light available to your camera, allowing you to further lengthen your exposure. This type of filter can be purchased for $15-30 on Amazon, so it's a worthy investment if you are keen on shooting waterfalls.
Alternatively, you want to shoot at low-light conditions. This means early morning, evening, and on cloudy days.
I've saved the most important thing for last:
You NEED a tripod.
There is no way you will able to achieve high-quality long exposure images without a tripod. Because the camera spends a long time exposing the image, capturing that motion of the water like we wanted, it will also capture any other unwanted movement; ie camera shake. You are not as steady as a tripod. Get a tripod (here's my review of the one listed below)
What if I don't have a fancy camera?
It certainly is harder to get the exact images you want if you can't control all of the camera's settings. However, you may still be able to get the effect if you stick to the basics of reducing the available light. As mentioned above, this means shooting in low light conditions, and, if possible, the application of light-reducing filters. If your camera has different preset modes, you want to avoid "night" mode (typically optimized for fast shooting in low light), and stick to something more akin to "landscape" mode (typically low ISO, small aperture). With some trial and error, you'll still be able to get the same effect!
All right! So, to recap, here are the steps to creating beautiful silky waterfall images:
1. You want to have a long exposure. To do this, set your aperture to as small as you can and your shutter speed to as low as you can.
2. Lower your ISO to the lowest allowed by your camera.
3. Apply your neutral density filter (or moderate your shooting conditions).
4. Always tripod. Always.
5. Succeed!
That's it! Let me know if you thought this guide was helpful (or not).
Don't forget to subscribe, share, and follow me on instagram and 500px!
Want more? Check out some my favorite locations for waterfall photography around northeast ohio: here and here!
 |
| Baring Falls - Glacier National Park - MT Shot @ 0.8s, F/16, ISO 100 |
What's the key to that milky look?
The short answer is your shutter speed. Shutter speed is how fast your camera takes the picture - thought of another way, it's how long the chip (or film) is exposed to the light. A short shutter speed freezes motion, while a long shutter speed creates a blurred impression of movement.
To achieve silky flowing water, you want to have a long shutter speed.
A long shutter speed will be read out as a lower number on your camera.
The number in the red box is the shutter speed. 200 is a relatively fast shutter speed; it won't give your waterfall photography the quality you are looking for.
That sounds great, but how do I get that?
In essence, you want to reduce the amount of light that your camera sees. To compensate for less available light, your camera will need to expose the chip for longer - thus giving you the silky waterfall appearance you want.
Depending on what kind of camera you have, you will need to adjust different parameters to achieve a long exposure. In the simplest terms, you want to change your shutter speed to the lowest number possible (shutter priority mode). However everything in life and photography is give and take - you will still have to reduce the overall light the camera sees to obtain a properly exposed image.
 |
| Letchworth State Park Shot at 0.6s, f/32, ISO 100 |
There are a few different ways to lengthen your shutter speed, and some of them will depend on the capabilities of your camera.
If you are able to, you will want to change to a small aperture and a low ISO rating.
Aperture is the opening through which the microchip in the camera sees light - remember, we want to reduce the amount of light available to the camera, so we want to make this opening as small as possible. Aperture is a fraction; thus a larger number means a smaller aperture.
Here I have highlighted the aperture; these numbers may appear in different places on your camera, or you may not have the option to see or change them at all.
"F" designates "aperture" on many cameras (you may also see this referred to as "stopping" or "f-stop"). This is properly interpreted as 1/13; remember you want to set your aperture to the smallest possible, so you want the largest number (because it's a fraction).
What about ISO?
ISO determines how sensitive your camera is to light; again, we are trying to reduce the amount of light available to we get a slow shutter speed, a long exposure, and the beautiful waterfall magic of our photography dreams. You want to set your ISO to the lowest number allowed by your camera.
Okay, great. So I've done all of the above - what else?
 |
| 0.6 stop tiffen neutral density filter |
Another important tool is a neutral density filter. This isn't the same kind of filter you'll find on Instagram, rather this attaches to the end of your lens and (again) reduces the amount of light available to your camera, allowing you to further lengthen your exposure. This type of filter can be purchased for $15-30 on Amazon, so it's a worthy investment if you are keen on shooting waterfalls.
Alternatively, you want to shoot at low-light conditions. This means early morning, evening, and on cloudy days.
I've saved the most important thing for last:
You NEED a tripod.
There is no way you will able to achieve high-quality long exposure images without a tripod. Because the camera spends a long time exposing the image, capturing that motion of the water like we wanted, it will also capture any other unwanted movement; ie camera shake. You are not as steady as a tripod. Get a tripod (here's my review of the one listed below)
 |
| My current travel tripod |
What if I don't have a fancy camera?
It certainly is harder to get the exact images you want if you can't control all of the camera's settings. However, you may still be able to get the effect if you stick to the basics of reducing the available light. As mentioned above, this means shooting in low light conditions, and, if possible, the application of light-reducing filters. If your camera has different preset modes, you want to avoid "night" mode (typically optimized for fast shooting in low light), and stick to something more akin to "landscape" mode (typically low ISO, small aperture). With some trial and error, you'll still be able to get the same effect!
All right! So, to recap, here are the steps to creating beautiful silky waterfall images:
1. You want to have a long exposure. To do this, set your aperture to as small as you can and your shutter speed to as low as you can.
2. Lower your ISO to the lowest allowed by your camera.
3. Apply your neutral density filter (or moderate your shooting conditions).
4. Always tripod. Always.
5. Succeed!
 |
| Hocking Hills State Park - OH Shot at 2.5s, F/25, ISO 160 |
That's it! Let me know if you thought this guide was helpful (or not).
Don't forget to subscribe, share, and follow me on instagram and 500px!
Want more? Check out some my favorite locations for waterfall photography around northeast ohio: here and here!


Comments
Post a Comment